
- Details
- Category: ESP32
Simple example of an ESP32 based Bluetooth Low Energy (BLE) Server. Server sends out a counter every second with Notify.
/*
  Based on Neil Kolban example for IDF: https://github.com/nkolban/esp32-snippets/blob/master/cpp_utils/tests/BLE%20Tests/SampleNotify.cpp
  Ported to Arduino ESP32 by Evandro Copercini
  updated by chegewara and MoThunderz
*/
#include <BLEDevice.h>
#include <BLEServer.h>
#include <BLEUtils.h>
#include <BLE2902.h>

BLEServer* pServer = NULL;
BLECharacteristic* pCharacteristic = NULL;
BLEDescriptor *pDescr;
BLE2902 *pBLE2902;

bool deviceConnected = false;
bool oldDeviceConnected = false;
uint32_t value = 0;

// See the following for generating UUIDs:
// https://www.uuidgenerator.net/

#define SERVICE_UUID        "4fafc201-1fb5-459e-8fcc-c5c9c331914b"
#define CHARACTERISTIC_UUID "beb5483e-36e1-4688-b7f5-ea07361b26a8"

class MyServerCallbacks: public BLEServerCallbacks {
    void onConnect(BLEServer* pServer) {
      deviceConnected = true;
    };

    void onDisconnect(BLEServer* pServer) {
      deviceConnected = false;
    }
};

void setup() {
  Serial.begin(115200);

  // Create the BLE Device
  BLEDevice::init("ESP32");

  // Create the BLE Server
  pServer = BLEDevice::createServer();
  pServer->setCallbacks(new MyServerCallbacks());

  // Create the BLE Service
  BLEService *pService = pServer->createService(SERVICE_UUID);

  // Create a BLE Characteristic
  pCharacteristic = pService->createCharacteristic(
                      CHARACTERISTIC_UUID,
                      BLECharacteristic::PROPERTY_NOTIFY
                    );

  // Create a BLE Descriptor

  pDescr = new BLEDescriptor((uint16_t)0x2901);
  pDescr->setValue("A very interesting variable");
  pCharacteristic->addDescriptor(pDescr);

  pBLE2902 = new BLE2902();
  pBLE2902->setNotifications(true);
  pCharacteristic->addDescriptor(pBLE2902);

  // Start the service
  pService->start();

  // Start advertising
  BLEAdvertising *pAdvertising = BLEDevice::getAdvertising();
  pAdvertising->addServiceUUID(SERVICE_UUID);
  pAdvertising->setScanResponse(false);
  pAdvertising->setMinPreferred(0x0);  // set value to 0x00 to not advertise this parameter
  BLEDevice::startAdvertising();
  Serial.println("Waiting a client connection to notify...");
}

void loop() {
    // notify changed value
    if (deviceConnected) {
        pCharacteristic->setValue(value);
        pCharacteristic->notify();
        value++;
        delay(1000);
    }
    // disconnecting
    if (!deviceConnected && oldDeviceConnected) {
        delay(500); // give the bluetooth stack the chance to get things ready
        pServer->startAdvertising(); // restart advertising
        Serial.println("start advertising");
        oldDeviceConnected = deviceConnected;
    }
    // connecting
    if (deviceConnected && !oldDeviceConnected) {
        // do stuff here on connecting
        oldDeviceConnected = deviceConnected;
    }
}- Details
- Category: ESP32
ESP32_BLE_Geonaute_Heart_Monitor_Client
/**
 * A BLE client example that is rich in capabilities.
 * There is a lot new capabilities implemented.
 * author unknown
 * updated by chegewara
 */

#include "BLEDevice.h"
//#include "BLEScan.h"

// The remote service we wish to connect to.
//static BLEUUID serviceUUID("0000180d-0000-1000-8000-00805f9b34fb");
static  BLEUUID serviceUUID(BLEUUID((uint16_t)0x180D));
// The characteristic of the remote service we are interested in.
static  BLEUUID    charUUID(BLEUUID((uint16_t)0x2A37));


static boolean doConnect = false;
static boolean connected = false;
static boolean doScan = false;
static boolean notification = false;
static BLERemoteCharacteristic* pRemoteCharacteristic;
static BLEAdvertisedDevice* myDevice;

static void notifyCallback(
  BLERemoteCharacteristic* pBLERemoteCharacteristic,
  uint8_t* pData,
  size_t length,
  bool isNotify) {
    Serial.print("Notify callback for characteristic ");
    Serial.print(pBLERemoteCharacteristic->getUUID().toString().c_str());
    Serial.print(" of data length ");
    Serial.println(length);
    //Serial.print("data: ");
    //Serial.println((char*)pData);
   if (length == 4){
    Serial.print("Heart Rate: ");
    Serial.print(pData[1],DEC);
    Serial.println("bpm");
   }


}

class MyClientCallback : public BLEClientCallbacks {
  void onConnect(BLEClient* pclient) {
  }

  void onDisconnect(BLEClient* pclient) {
    connected = false;
    Serial.println("onDisconnect");
  }
};

bool connectToServer() {
    Serial.print("Forming a connection to ");
    Serial.println(myDevice->getAddress().toString().c_str());

    BLEClient*  pClient  = BLEDevice::createClient();
    Serial.println(" - Created client");

    pClient->setClientCallbacks(new MyClientCallback());

    // Connect to the remove BLE Server.
    pClient->connect(myDevice);  // if you pass BLEAdvertisedDevice instead of address, it will be recognized type of peer device address (public or private)
    Serial.println(" - Connected to server");

    // Obtain a reference to the service we are after in the remote BLE server.
    BLERemoteService* pRemoteService = pClient->getService(serviceUUID);
    if (pRemoteService == nullptr) {
      Serial.print("Failed to find our service UUID: ");
      Serial.println(serviceUUID.toString().c_str());
      pClient->disconnect();
      return false;
    }
    Serial.println(" - Found our service");


    // Obtain a reference to the characteristic in the service of the remote BLE server.
    pRemoteCharacteristic = pRemoteService->getCharacteristic(charUUID);
    if (pRemoteCharacteristic == nullptr) {
      Serial.print("Failed to find our characteristic UUID: ");
      Serial.println(charUUID.toString().c_str());
      pClient->disconnect();
      return false;
    }
    Serial.println(" - Found our characteristic");

    // Read the value of the characteristic.
    if(pRemoteCharacteristic->canRead()) {
      std::string value = pRemoteCharacteristic->readValue();
      Serial.print("The characteristic value was: ");
      Serial.println(value.c_str());
    }

    if(pRemoteCharacteristic->canNotify())
      pRemoteCharacteristic->registerForNotify(notifyCallback);

    connected = true;
    return true;
}
/**
 * Scan for BLE servers and find the first one that advertises the service we are looking for.
 */
class MyAdvertisedDeviceCallbacks: public BLEAdvertisedDeviceCallbacks {
 /**
   * Called for each advertising BLE server.
   */
  void onResult(BLEAdvertisedDevice advertisedDevice) {
    Serial.print("BLE Advertised Device found: ");
    Serial.println(advertisedDevice.toString().c_str());

    // We have found a device, let us now see if it contains the service we are looking for.
    if (advertisedDevice.haveServiceUUID() && advertisedDevice.isAdvertisingService(serviceUUID)) {

      BLEDevice::getScan()->stop();
      myDevice = new BLEAdvertisedDevice(advertisedDevice);
      doConnect = true;
      doScan = true;

    } // Found our server
  } // onResult
}; // MyAdvertisedDeviceCallbacks


void setup() {
  Serial.begin(9600);
  Serial.println("Starting Arduino BLE Client application...");
  BLEDevice::init("");

  // Retrieve a Scanner and set the callback we want to use to be informed when we
  // have detected a new device.  Specify that we want active scanning and start the
  // scan to run for 5 seconds.
  BLEScan* pBLEScan = BLEDevice::getScan();
  pBLEScan->setAdvertisedDeviceCallbacks(new MyAdvertisedDeviceCallbacks());
  pBLEScan->setInterval(1349);
  pBLEScan->setWindow(449);
  pBLEScan->setActiveScan(true);
  pBLEScan->start(5, false);
} // End of setup.


// This is the Arduino main loop function.
void loop() {

  // If the flag "doConnect" is true then we have scanned for and found the desired
  // BLE Server with which we wish to connect.  Now we connect to it.  Once we are
  // connected we set the connected flag to be true.
  if (doConnect == true) {
    if (connectToServer()) {
      Serial.println("We are now connected to the BLE Server.");
    } else {
      Serial.println("We have failed to connect to the server; there is nothin more we will do.");
    }
    doConnect = false;
  }

  // If we are connected to a peer BLE Server, update the characteristic each time we are reached
  // with the current time since boot.
  if (connected) {
    if (notification == false) {
      Serial.println(F("Turning Notifocation On"));
      const uint8_t onPacket[] = {0x1, 0x0};
      pRemoteCharacteristic->getDescriptor(BLEUUID((uint16_t)0x2902))->writeValue((uint8_t*)onPacket, 2, true);
      notification = true;
    }
  }

  delay(1000); // Delay a second between loops.
} // End of loop- Details
- Category: ESP32
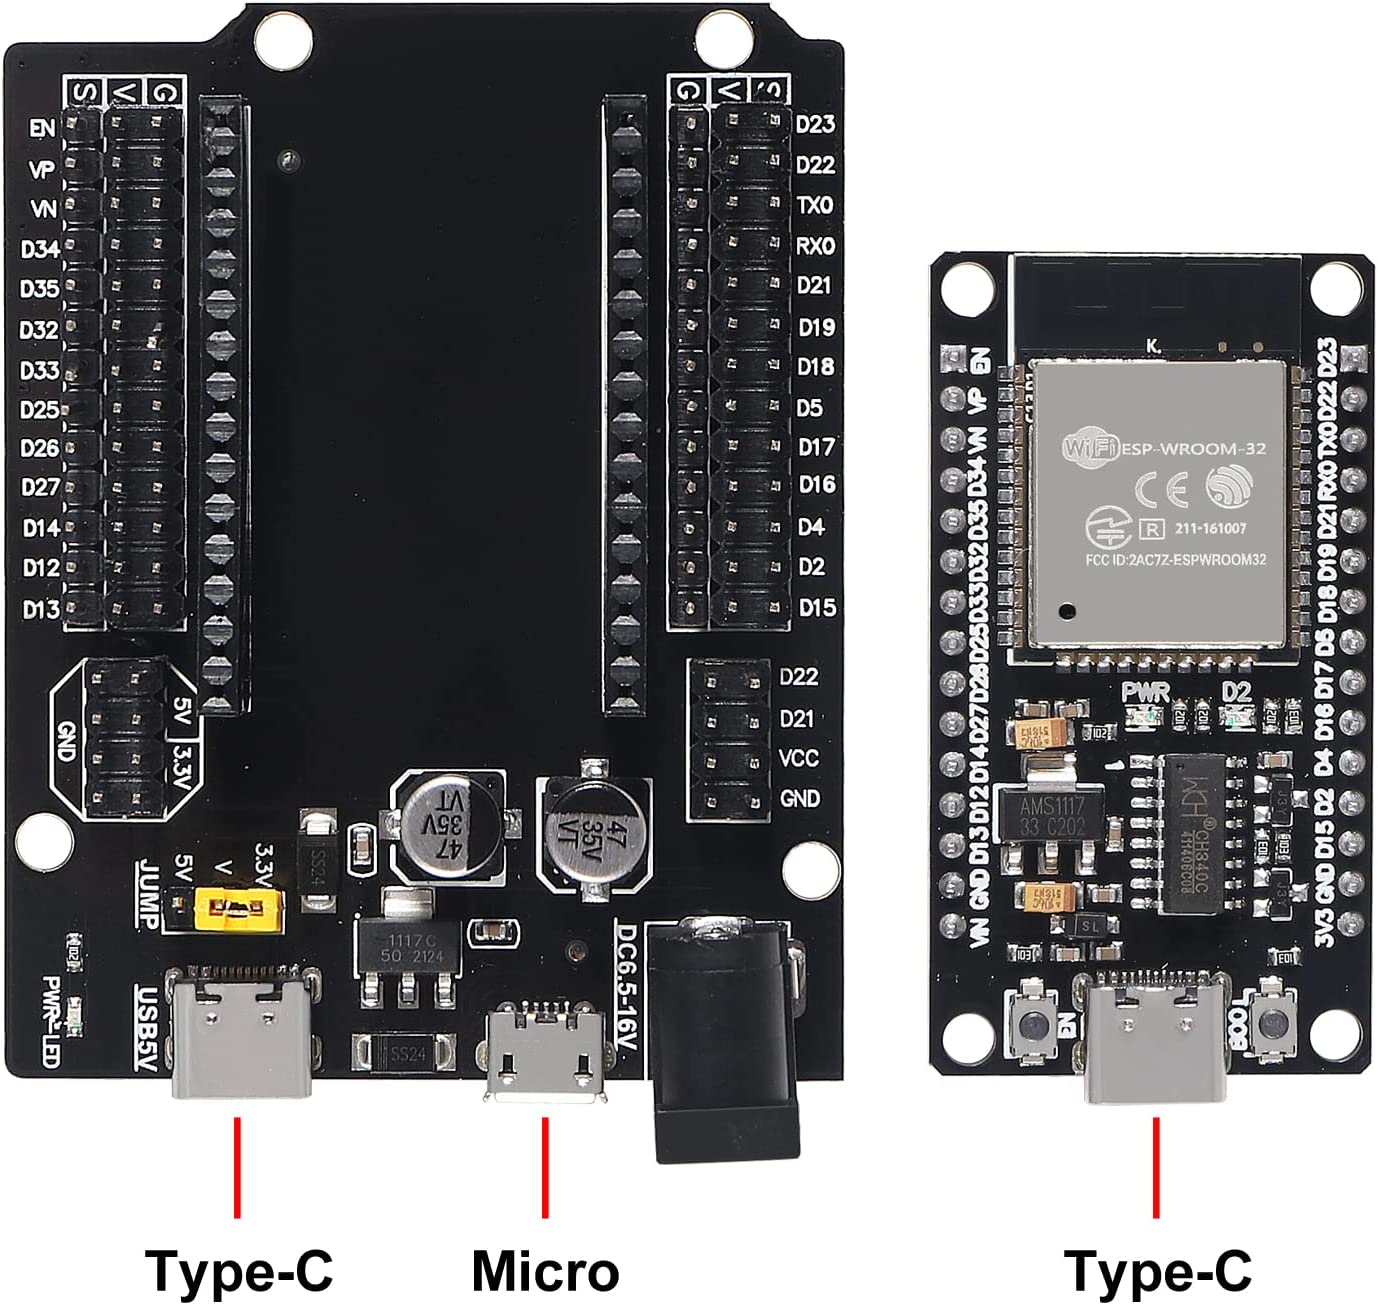
ESP32 Dev Board
Tutorials
Article Here
ESP32-WROOM-32 Download mode
EN - reset
Boot IO0
Hold Boot button, Press & release Reset button
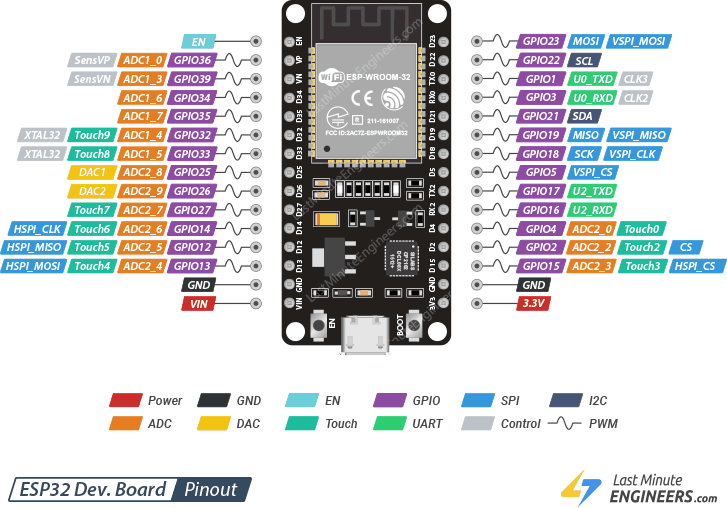
Analog to Digital Converter (ADC)
- ADC1_CH0 (GPIO 36) *
- ADC1_CH1 (GPIO 37)
- ADC1_CH2 (GPIO 38)
- ADC1_CH3 (GPIO 39) *
- ADC1_CH4 (GPIO 32) *
- ADC1_CH5 (GPIO 33) *
- ADC1_CH6 (GPIO 34) *
- ADC1_CH7 (GPIO 35) *
- ADC2_CH0 (GPIO 4)
- ADC2_CH1 (GPIO 0)
- ADC2_CH2 (GPIO 2)
- ADC2_CH3 (GPIO 15)
- ADC2_CH4 (GPIO 13)
- ADC2_CH5 (GPIO 12)
- ADC2_CH6 (GPIO 14)
- ADC2_CH7 (GPIO 27)
- ADC2_CH8 (GPIO 25)
- ADC2_CH9 (GPIO 26)
Analog Inputs (ADC)
Reading an analog value with the ESP32 means you can measure varying voltage levels between 0 V and 3.3 V.
The voltage measured is then assigned to a value between 0 and 4095, in which 0 V corresponds to 0, and 3.3 V corresponds to 4095. Any voltage between 0 V and 3.3 V will be given the corresponding value in between.
Even though ESP32 has 18 channels ADC, all the ADC pins are not available for the user. Of the 8 ADC1 channels, only 6 are available (ACD1_CH0 and ACD1_CH3 to ACD1_CH7) while ADC1_CH1 and ADC1_CH2 are not available (even the pins are not exposed in the ESP32 Development Board).
analogRead() Function
Reading an analog input with the ESP32 using the Arduino IDE is as simple as using the analogRead() function. It accepts as argument, the GPIO you want to read:
analogRead(GPIO);
These analog input pins have 12-bit resolution. This means that when you read an analog input, its range may vary from 0 to 4095.
ESP32 I2C Communication
Connecting an I2C device to an ESP32 is normally as simple as connecting GND to GND, SDA to SDA, SCL to SCL and a positive power supply to a peripheral, usually 3.3V (but it depends on the module you’re using).
| I2C Device | ESP32 |
| SDA | SDA (default is GPIO 21) |
| SCL | SCL (default is GPIO 22) |
| GND | GND |
| VCC | usually 3.3V or 5V |
SPI
For SPI communication you need four lines:
- MISO: Master In Slave Out
- MOSI: Master Out Slave In
- SCK: Serial Clock
- CS /SS: Chip Select (used to select the device when multiple peripherals are used on the same SPI bus)
Many ESP32 boards come with default SPI pins pre-assigned. The pin mapping for most boards is as follows:
| SPI | MOSI | MISO | SCLK | CS |
| VSPI | GPIO 23 | GPIO 19 | GPIO 18 | GPIO 5 |
| HSPI | GPIO 13 | GPIO 12 | GPIO 14 | GPIO 15 |
Oled
see here
|
OLED Display |
ESP32 (VSPI) | ESP32 (HSPI) | |
| GND |
GND |
GND |
|
|
VCC |
3.3V | 3.3V | |
| D0 (SCK) |
GPIO 18 (D18) |
GPIO 14 (D14) |
|
|
D1 (MOSI) |
GPIO 23 (D23) | GPIO 13 (D13) | |
| RES (any gen pin) |
GPIO 17 (TX2) (D17) |
GPIO 17 (TX2) (D17) |
|
|
DC (any gen pin) |
GPIO 16 (RX2) (D16) | GPIO 16 (RX2) (D16) | |
| CS |
GPIO 5 (D5) |
GPIO 15 (D15) |
|
ESP32 with Multiple SPI Devices
As we’ve seen previously, you can use two different SPI buses on the ESP32 and each bus can connect up to three different peripherals. This means that we can connect up to six SPI devices to the ESP32. If you need to use more, you can use an SPI multiplexer.