Gantry 5
  • Featured
  • Topics
      • Back
      • Coding
          • Back
          • Arduino Coding
          • Databases
      • Inland Waterways
          • Back
          • Trent and Mersey Canal Locations
          • Inland Waterways Database crt canals
          • 3 Locks Around Barton
      • Internet Of Things (IOT)
      • Electronics
          • Back
          • Raspberry Pi
          • Arduino
      • Renewable Energy
          • Back
          • Wind Tubines
          • Water Turbines
      • Electric Vehicles (EV,s)
          • Back
          • Ebikes
          • Drones
      • Blender
  • About
  • Login
  1. You are here:  
  2. Home
  3. Topics
  4. Electronics
  5. ESP32

ESP32-S3-Touch-LCD-7

Details
Category: ESP32
  • ESP32

Wiki

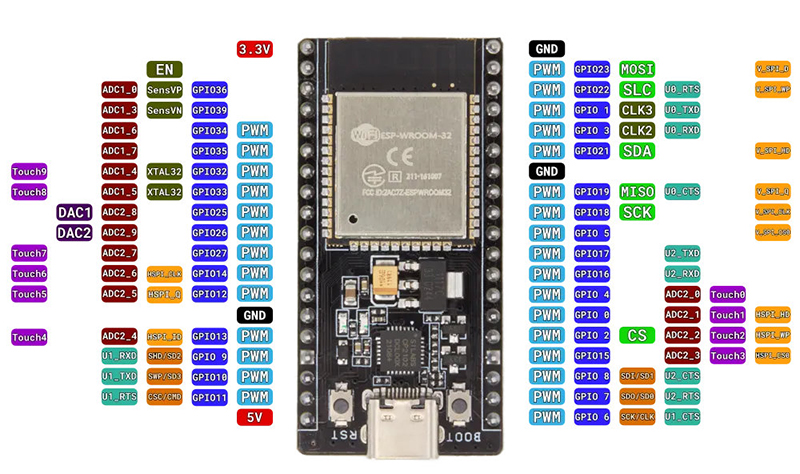
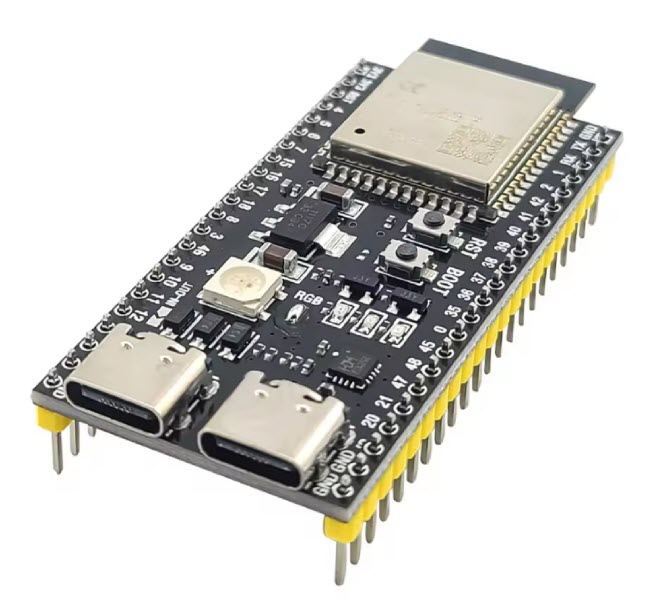
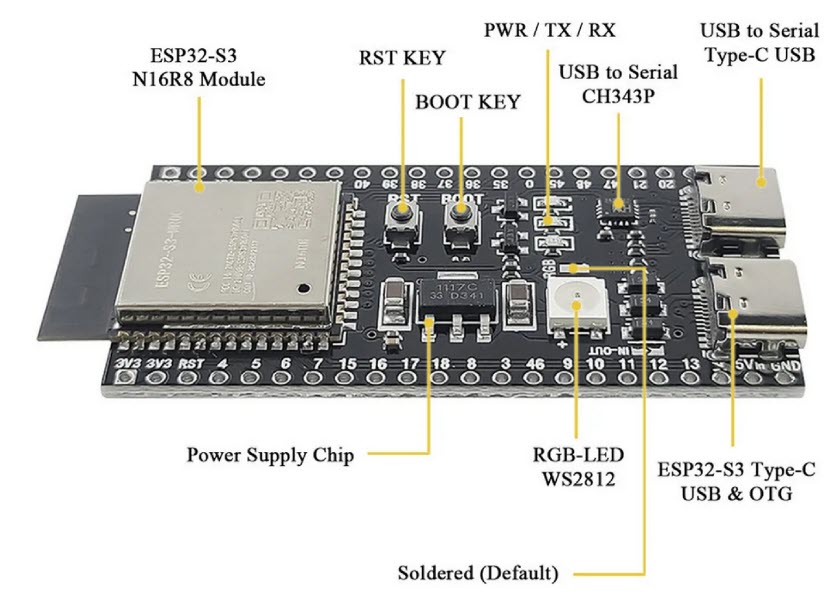
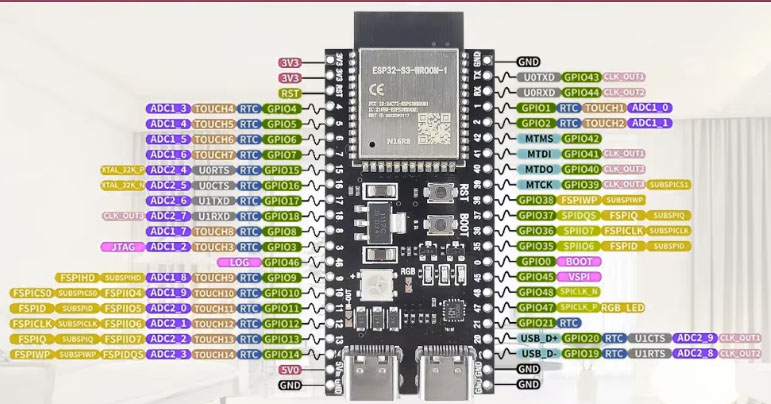
Based on the Espressif ESP32-S3-WROOM-1 microcontroller

and

Sitronix ST7262 800RGB x 480 dual gate TFT-LCD panel

Arduino IDE Setup Notes

Board Configuration

Initial testing

1st make use this BareMinimum sketch to make sure you can upload to the board.

  1. If the sketch does not upload try changing the Upload speed to 11520
void setup() {
  // put your setup code here, to run once:

}

void loop() {
  // put your main code here, to run repeatedly:

}

Install  ESP32_Display_Panel  library with library manager

ESP32_Display_Panel is a library designed for ESP SoCs to drive display panels and facilitate rapid GUI development.

Currently supported board manufacturers: Espressif,M5Stack,Waveshare,Elecrow,Jingcai. Currently supported devices: Bus,LCD,Touch,Backlight,IO expander. Currently supported Bus: I2C,SPI,QSPI,3-wire SPI + RGB,MIPI-DSI. Currently supported LCD controllers: EK9716B,EK79007,GC9A01,GC9B71,GC9503,ILI9341,ILI9881C,JD9365,NV3022B,ST7262,ST7701,ST7789,ST7796,ST77916,ST77922. Currently supported Touch controllers: CST816S,FT5x06,GT1151,GT911,ST7123,TT21100,XPT2046.


You might get the following message:

The library ESP32_Display_Panel: 1.0.0 needs some other library dependencies currently not installed
ESP32_IO_Expander
esp-lib-utils
Would you like to install also all the missing dependencies?

Click 'yes' to install  ESP32_IO_Expander

ESP32_IO_Expander must be version 0.1.0 so after installation go into 'Manage Libraries and downgrade it.

Open Examples->ESP32_Display_Panel->arduino->board_static_config
save the exaple as a new name such as myboard_static_config

Follow the steps below to configure:

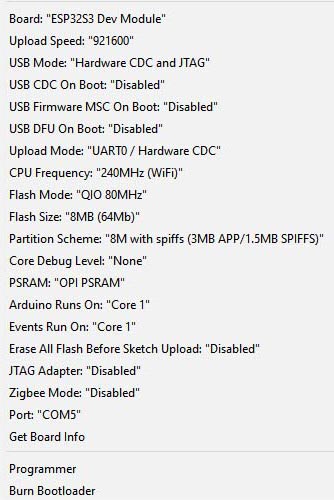
1 In the Arduino IDE choose an ESP board and configure its parameters. Make sure PSRAM is enabled

Waveshare ESP32-S3-Touch-LCD-7

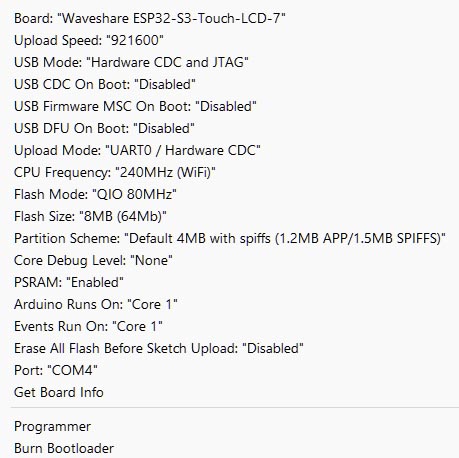
Can work using ESP32S3 Dev Module 

2 Follow the setup for supported boards. here

  1. Set the ESP_PANEL_USE_SUPPORTED_BOARD macro definition in the ESP_Panel_Board_Supported.h file to 1.
  2. Uncomment the corresponding macro definition for the target development board model.
  3. If the sketch does not upload try changing the Upload speed to 115200

For the Arduino IDE you have to move examples and demos down to the src folder because the Arduino IDE only references the library's source folder

SSD1306 SPI (Serial Peripheral Interface)

Details
Category: ESP32

Pins

Pin   Colour   Other Desc ESP32 UNO
1 GND Black          
2 VCC Red          
3 D0 Brown SCK SCLK (SD-Clock) SPI Clock 14 13
4 DI White SDA MOSI  SPI Master out Slave in 13 11
5 RES Purple RES MISO SPI Master in Slave out Reset 17 12
6 DC Grey DC     16  
7 CS Yellow CS   Chipselect 15 10

Finding your ESP32 Board’s Default SPI Pins

Details
Category: ESP32
/*
  Rui Santos
  Complete project details at https://RandomNerdTutorials.com/esp32-spi-communication-arduino/
  
  Permission is hereby granted, free of charge, to any person obtaining a copy
  of this software and associated documentation files.
  
  The above copyright notice and this permission notice shall be included in all
  copies or substantial portions of the Software.
*/

//Find the default SPI pins for your board
//Make sure you have the right board selected in Tools > Boards
void setup() {
  // put your setup code here, to run once:
  Serial.begin(115200);
  Serial.print("MOSI: ");
  Serial.println(MOSI);
  Serial.print("MISO: ");
  Serial.println(MISO);
  Serial.print("SCK: ");
  Serial.println(SCK);
  Serial.print("SS: ");
  Serial.println(SS);  
}

void loop() {
  // put your main code here, to run repeatedly:
}

ESP32 CAM

Details
Category: ESP32


The ESP32-CAM is a development board with an ESP32-S chip, an OV2640 camera, microSD card slot and several GPIOs to connect peripherals. 

The esp32_camera component allows you to use ESP32-based camera boards in ESPHome that directly integrate into Home Assistant through the native API.

See here 

Other articles

1

2

3

4


ESP32 BLE Heart Rate Emulator

Details
Category: ESP32

How to make a dummy Bluetooth Low Engery Heart Rate Emulator for testing purposes

Background to Bluetooth.

There are 2 types of bluetooth

Serial Bluetooth or 'Bluetooth Classic'
BLE or 'Bluetooth Low Energy'

Serial Bluetooth is a continuous data stream of high energy
BLE is a messaged based low energy.

We have a 'Server' that communicates with 1 or more 'Clients'. The Server posts information via a profile which contains Services and each Service has different characteristics.

A standard has been developed  for the ID's or UUIDs of these devices. This BLE Specification can be found here

For example a BLE heart rate monitor has a 'Blood Pressure Service' with the 16-Bit Short UUID of 0x1810
In this 'Service' we have the 'Blood Pressure Measurement' Characteristic with a UUID of 0x2A35.

1 Make sure the BLE libraries are installed

In the arduino IDE goto Sketch->Include Library->Manage Libraries. Then search for 'ESP32 BLE Arduinio'


  1. BLE with ESP32 tutorial part 2: the client
  2. BLE with ESP32 tutorial part 1: the Server
  3. Esp32BlePart2
  4. Esp32BlePart1 The Server
© 2025 M.Norridge
nbMawddach